Bases, markers and routes
Bases
After clicking on the "Bases and markers" button, the "Bases, markers and routes" menu will open on the "Markers" module. Within this menu, bases can be added to the project, modified and/or removed.
Bases include a position (altitude above mean sea level included) and can include a description, as well as information on extra equipment available in the base. The two latter need to be defined by the user.
With the 'Bases' module open, you can create new bases by clicking directly on the desired location on the map. The position of a base can be edited by clicking on it and dragging it to the new location.
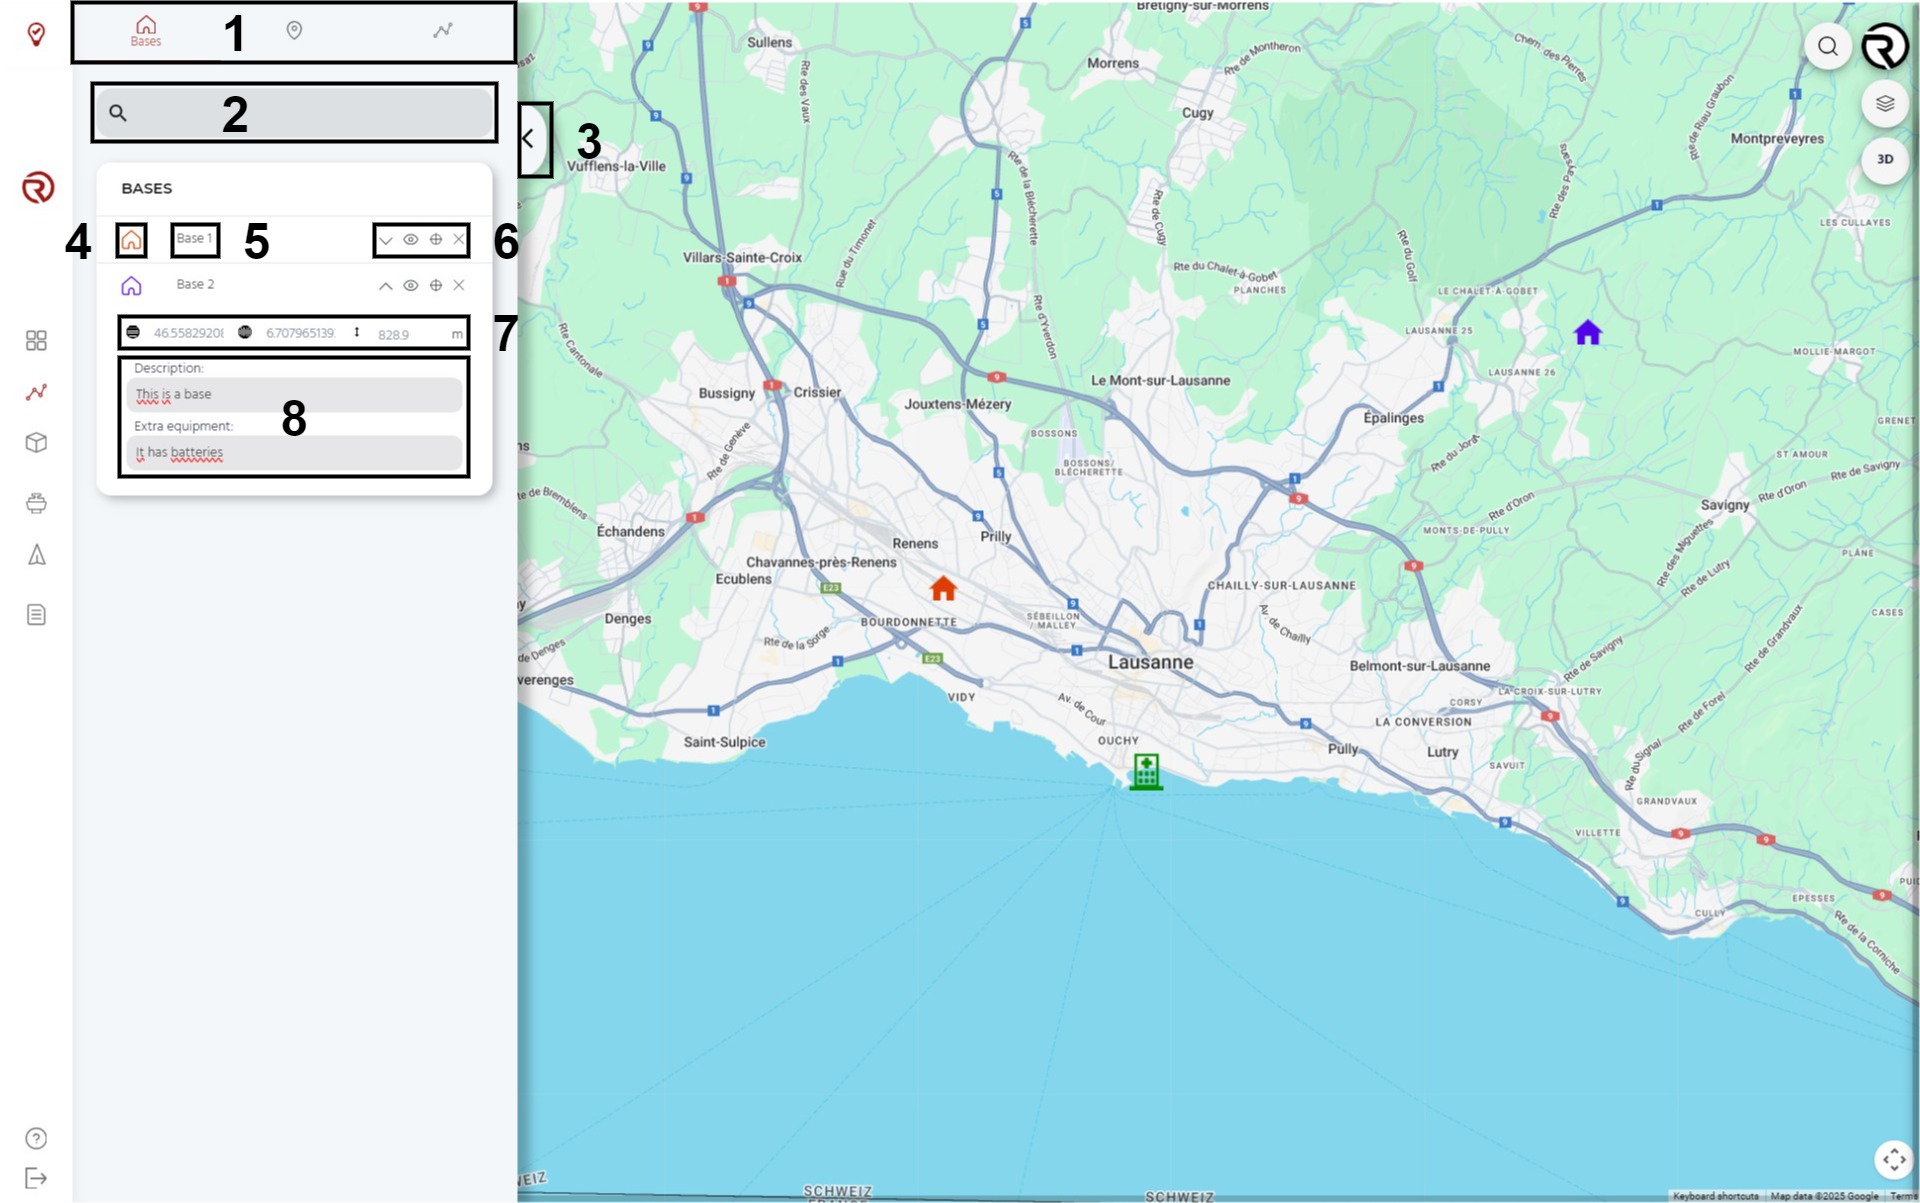
- Tab selector: there are three icons representing, from left to right, the different modules of the menu: "Bases", "Markers" and "Routes". The tab selected will have its name shown and its colour will turn to red.
- Search box: with the help of the search box, depending on the open module, it is possible to search specific bases, markers or routes.
- Close the menu: closes the bases, markers or routes menu.
- Colour selector: bases will be shown in the map with a house icon. The colour can be modified by clicking on the icon displayed in the menu.
- Name editor
- General tools: by clicking on the different icons, from left to right, it is possible to:
- Show/hide information of the base.
- Show/hide the base/marker on the map.
- Go to base (centers the map on the selected base).
- Remove base.
- Position: if a base/marker is selected and its information shown, from left to right, the position of the base will be displayed:
- Latitude.
- Longitude.
- Altitude of the base/marker (AMSL).
- The coordinates can be edited by writing or pasting a new value in decimal format.
- Zeros need to be written before the last decimal. Zeros written in the last position (before writing subsequent decimals), will not be taken.
- If the format or the number is incorrect, it will be positionned in an unexisting position.
- Description and extra equipment: a description and information on extra equipment available on the base can be added.
Markers
After clicking on the "Bases and markers" button, the "Bases, markers and routes" menu will open on the "Markers" module. In order to access the "Markers" module, the corresponding menu shall be selected.
Markers can help to understand the context in which the flights will take place, for example, by showing relevant infrastructures (such as airports or hospitals).
Additionally, their use is required to mark exact takeoff and landing positions measured with a drone.
With the 'Markers' module open, new markers are generated by clicking directly on the desired location on the map. The position of a marker can be edited by clicking on it and dragging it to the new location.
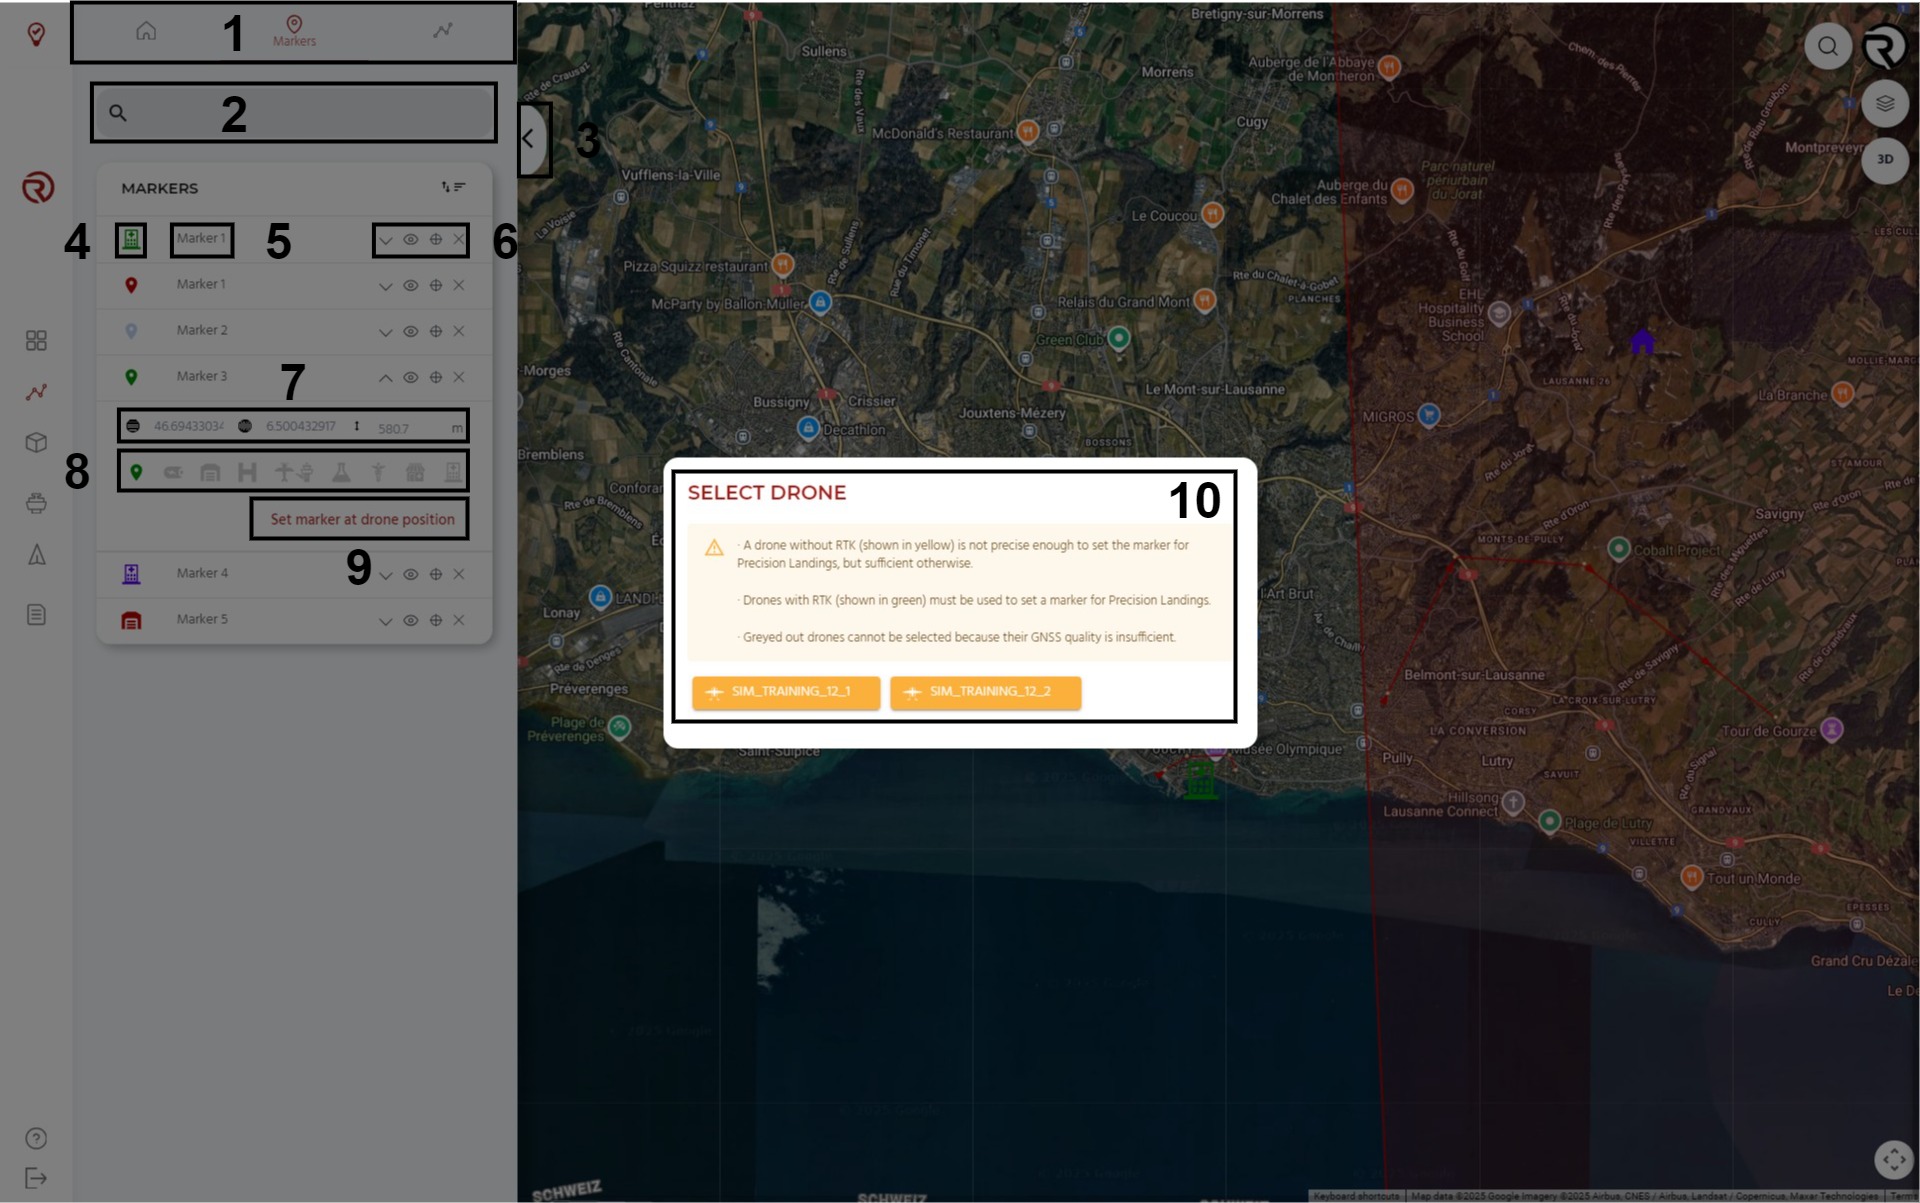
Most of the tools available for markers are identical to the ones presented for bases.
- Tab selector
- Search box
- Close the menu
- Colour selector
- Name editor
- General tools
- Position
- Marker type: modifies the icon of the marker in order to better represent its purpose. From left to right, the different options are:
- Generic marker
- Recharge station
- Warehouse
- Heliport
- Aerodrome
- Airport
- Laboratory
- Pharmacy
- Clinic
- Hospital
- Set marker at drone position: opens a window to update the position based on online drones. By clicking on a given drone, the coordinates of the marker will be updated based on that drone's coordinates.
- Green: drone with RTK precision.
- Yellow: drone without RTK precision.
- Grey: drone without sufficient GNSS quality.
- Note: Simulators are also displayed (in yellow) for training and testing purposes.
Markers must be used to mark the takeoff and landing position in when editing a route. If a marker is linked to a route and the marker is then moved or removed, a warning will be displayed to confirm the action.
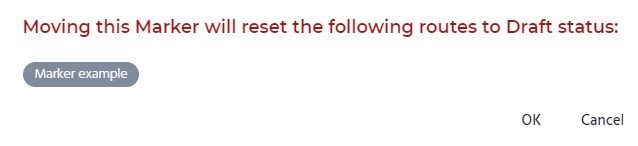
This behaviour is linked to safety checks for the takeoff and warning points, explained in Safety checks.
Routes
After clicking on the "Routes" button, the "Bases, markers and routes" menu will open on the "Routes" module.
Routes are one of the most important elements of RigiCloud, as they are key elements of any automatic UAS operation. Therefore, multiple sections will show all the functionalities available, including some insights on how to prepare a safe route (Route planning overview, Mission, Geocages, Rally Points, Safety settings, Safety checks and Operation structure). However, for now, routes are discussed only as another element of the map.
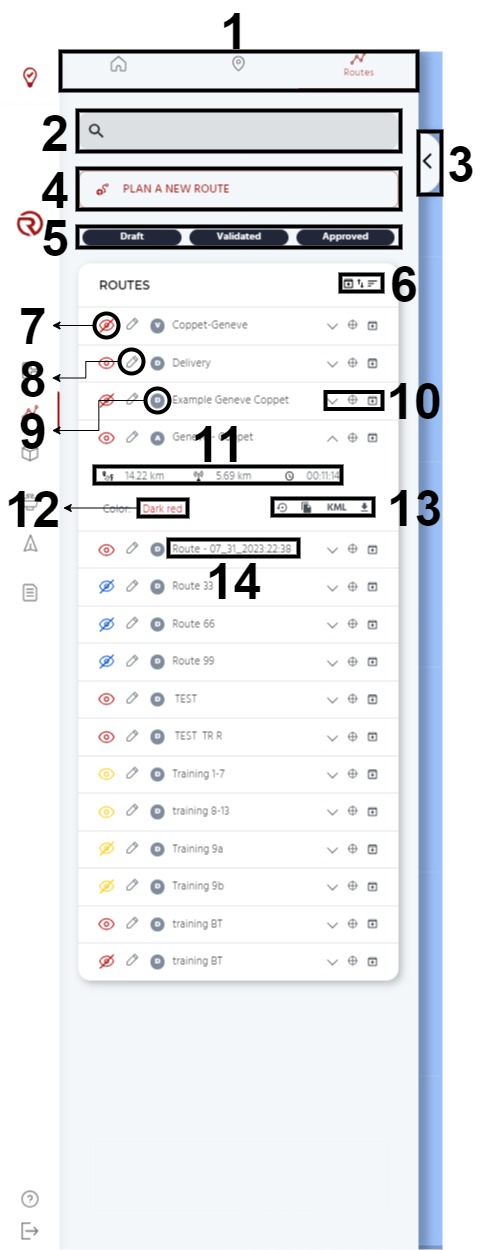
Some of the tools available for routes are identical to the ones presented for bases and markers.
- Module selector
- Search box
- Close the menu
- Plan a new route: opens the route planner and allows to create a new route. By default, new routes have a "Draft" route state.
- Route state filter: shows/hides routes by their state. States shown have a dark button, while states hidden have a light button. More information on sates is given in Route planning overview. From left to right:
- Draft
- Validated
- Approved
- Sorting options: similar to the equivalent options for markers. Additionally, the left button allows to show/hide archived routes.
- Show/hide route
- Edit route: opens the route planner and allows to modify an existing route.
- Routes tools: by clicking on the different icons, from left to right, it is possible to:
- Show/hide information of the route.
- Go to route (centers the map in the selected route).
- Archive route. When showing archived routes, this icon becomes "Unarchive routes" in archived routes.
- Remove route (only when showing archived routes, in archived routes).
- Route information: shows the main information of the route. From left to right:
- Estimated flight distance.
- Estimated time of the flight.
- Colour editor: changes the colour of the flight path displayed in the map.
- Clonation and exportation tools: different tools to clone and export routes. From left to right:
- Reverse route: creates and opens a reversed clone of the route in the same project (useful to do when the first way of a two way operation is already planned and approved). The reversed route needs to be saved manually and reviewed by the operator. Its state becomes "Draft" by default.
- Clone route: creates and opens a cloned route in the same project (useful for having similar routes with minor modifications, or to create a route based on an existing one). The cloned route needs to be saved manually. Its state becomes "Draft" by default.
- Download kml: downloads the route in .kml format (useful for sharing the geography of the route with other stakeholders, such as regulators).
- Download: downloads the route in .plan format (useful to copy it into other RigiCloud projects or servers, as well as to prepare back-ups).
- "Download" should be prioritised over "Download kml" if the flight plan may be re-imported later to RigiCloud. For external exportations (e.g. Google Earth), "Download kml" should be used instead.
- Name editor
Within the "Routes" module, new routes can be planned by clicking on "Plan a new route" and existing routes can be edited (both by searching it in the list or by right-clicking on its representation in the map and selecting "Edit route").